Have you ever gone to bed with your significant other only to realize that you both are hot, but both of you are so exhausted and already comfortable under the covers that no one wants to get back out of bed to turn on the fan??? Happens to us, I’m afraid to admit. What’s the solution to our lazy problem?
Well, here’s a PECHAM F2 Universal Ceiling Fan Remote Control that is now located next to us on the nightstand. After installation of the kit, we have been able to enjoy this convenient solution.
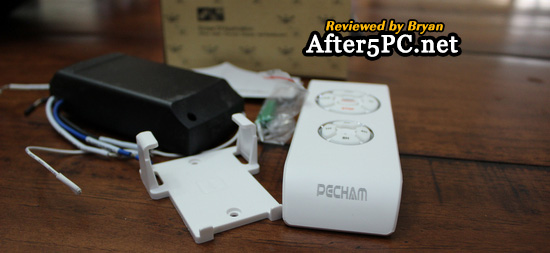
When you open the package, you should find the following contents:
– manual
– white remote control and holder (with hardware — ie screws)
– black controller kit
The remote comes with a battery, which is a big plus. Just pull out the temporary tab when you are ready to use the remote. The remote has controls to turn the light on and off, as well as turn on the fan with 3 different speeds. One of the good features that I like about this is the sleep mode. You can set the unit to turn off after a certain period of time. There are several options to choose from on the remote: 1 hour, 2 hrs, 4 hrs, 8 hrs. It worked flawlessly during my test of this feature, and I’ve verified my fan turning off within the 2 hrs, as selected.

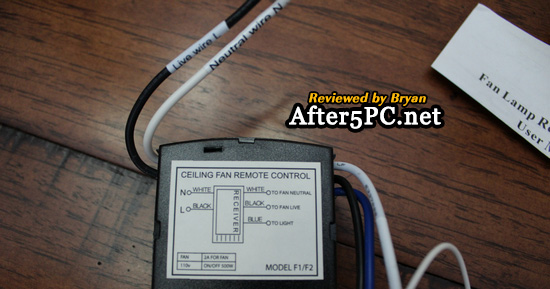
You will find 5 wires going out of the controller kit. The good thing to note is that each wire is pre-labeled, which is really useful during installation. In case the labels come off in the future (if that happens at all), the controller kit also has a backup diagram ‘stickered’ unto it for your reference. Those are both visible in the photo below.
Installation was a challenge, but certainly doable. You’ll see why I say that as you read further. In my case, I was not able to install the controller kit unto the fan itself –as instructed on the manual–because the cover of the base of the fan is small with the specific model of fan installed at our home — and the controller kit would not fit inside if I put the cover back on. I was a little worried that I’d find the unit useless at this point. However, I decided to see if it would work if installed directly instead on the wall switch (where you turn the fan or light on and off). To my delight, it did!
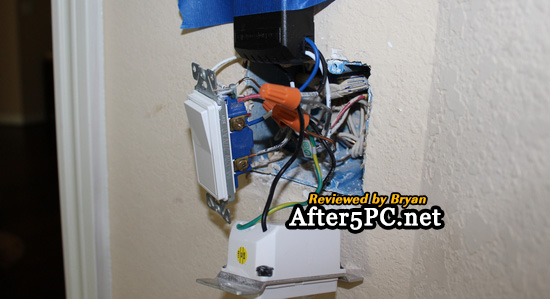
In the photo above, you can see that I have removed the wall plate and pulled out the wires and switches. I decided to put the controller unit above the wall switch and used a painter’s tape to hold it there temporarily while I tried to make the wire connections.
(WARNING: Turn off the main power to your house prior to messing with any electrical components or you will receive the shock of your life! Or perhaps your last shock ever! The power fuse to disconnect power should be somewhere in your garage in most cases, or outside in some houses. If you don’t know anything about electricity and working with electrical wires, then I suggest getting an electrician to install this unit for your own safety).
My only complaint was that the wires coming off the controller unit were a little short and does not give you enough length to work with (I don’t know if this is because the controller was meant to be installed on the fan, not the wall switch as in my case). It was no big deal, however, and I ended up lengthening the wires so that I can connect properly to the wires on the wall. After making the proper connections and putting back the fan/light switches and replacing the wall plate/cover, here is the end result:
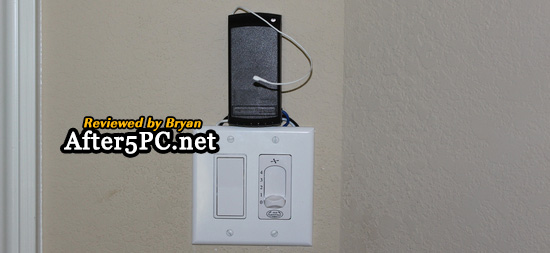
The white wire that you see extending out of the controller unit is the antenna for transmitting/receiving signals from the remote (At least, that’s what I think it is). The unit beeps when any setting in the remote is pressed, letting you know that they are communicating properly with each other. By the way, you’ll have to press the 1H button first on the remote before your first use to set the controller and remote in the same frequency. And just a heads up: the manual appears to be made by a Chinese company (based on the sentence structure). Reading it word for word in some of the instructions will just confuse you. Just read the whole thing and understand the context of what they are saying. You’ll do better following the manual. That’s what I had to do, and it worked for me.
The alternative installation as I have described above (instead of installing on the fan end as the manual instructed) has been working so far. I am able to turn on and off the lights/fan from the remote, as well as utilize the manual switch if preferred.
If you are interested, this PECHAM F2 Universal Ceiling Fan and Light Remote Controller Kit is available at a 66% discount at Amazon at the time of this writing. Again, it’s convenient way to control the lights/fan from bed. Have no complaints with its function so far!


0 Comments